Here are some great accessories to add for your project! just click on the photos for more info and pricing.
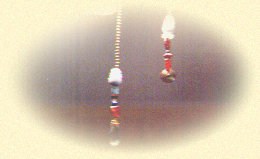
BEADED FAN PULL
THESE BEADED PULLS ARE A CUSTOM
ADDITION TO ANY CEILING FAN OR
LIGHT FIXTURE WITH A HANGING
PULL CORD. SINCE ONLY A FEW BEADS
ARE NEEDED, IT IS EASIER TO SPLURGE
ON EXQUISITE BEADS SUCH AS: CUT
CRYSTAL, SILVER OR SHAPED GLASS.
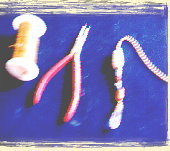
MATERIALS LIST:
24 GAUGE OR LOWER GOLDTONE OR SILVERTONE 2 1/2" HEAD PINS
4" BALL CHAIL PIECES
24 GAUGE BEADING WIRE
1 LARGE WOOD BEAD IN COORDINATING COLOR
VARIOUS LARGE AND SMALL JEWELRY BEADS
2 LARGE METAL BEAD CRIMPS
ROUND-NOSE "ROSARY" PLIERS
FLAT-NOSE PLIERS/SNIPS
STEPS:
Place beads on the head-pin in chosen pattern and set aside.(NOTE: A bigger bead works best on the bottom, butif the hole is too big for the head pin, use a small round bead first and then the larger one.) The bead design should be no longer than 1 inch and there should be enough unused wire at the top of the head pin for looping.
Clip about 3-4 inches of the 24 gauge wire and twist tightly around the last 3 balls on your ball chain in a "hangman's fashion" (wrapped in a symmetrical manner) Leave 1 inch of wire on the end and form a small loop with the mid section of the rosary piers. Use the excess wire to "tie a knot" at the top of the loop and continue wrapping up the last 3 balls this time, but also in a symmetrical manner. (Make sure this part is secure because the head pin will be attached here and will bet a lot of tugging.)
Use the flat-nosed pliers to "pinch" the large bead crimp over the end section of the ball chain, covering the "hangman" wrapped portion. (Make sure the "teeth" of the crimp "bite" one of the bals on the chain for support)
Now, take the head pin with the beads and form a loop at the top of the beads with the middle section of the rosary pliers tip.(There should be about 1/2 inches excess from the loop to twist with) Place that portion through the loop created on the end of the ball chain and twist the excess back onto itself in the "hangman" or symmetrical fashion. You can not put another "crimp" on this portion and "pinch" it tight for strength.
Lastly, take the large wooden beand and thread it over the ball chain portion, covering the wire wrapping and crimp. (note: if the hole is not big enough to cover the wire, you can drill it a little bigger if your bead is large enough.) -- YOU CAN ALSO PUT JEWELRY GLUE SUCH AS:
"E-6000" AFTER YOU HAVE THREADED THE WOODEN BEAD TO HOLD IT IN PLACE OVER THE WIRE AREA.
VARIATIONS: USE EYE PINS INSTEAD OF HEAD PINS AND LOOP BEADED ONES TOGETHER UNTIL YOU HAVE ONE
LONG ENOUGH TO CREATE A DECORATIVE BORDER FOR A LAMP SHADE. (DON'T USE PLASTIC BEADS OR THEY COULD MELT!)
ALL OF OUR PROJECTS ARE EVIDENT OF OUR PERSONAL APPLICATION OF THE STEPS INVOLVED, WE DO NOT
GUARANTEE THE OUTCOME OF ANY SUBSEQUENT APPLICATIONS AS WE CANNOT CONTROL THE APPLICATION
OF THE STEPS BY THIRD PARTIES. **SAFETY AND CAUTION MUST ALWAYS BE USED WHEN ATTEMPTING ANY
CRAFT OR PROJECT.