
Painted Clock Project
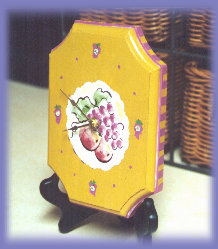
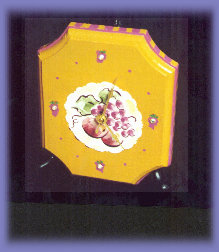
This is a great project because this distinctive look is created with an inexpensive wood plaque and craft paint! The look is wonderful.
Materials:
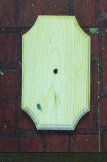
- 1 unfinished wood plaque
- craft acrylic paints in choice of colors
- 1/4 inch flat artist paintbrush.
- 1 1-inch artist paint brush
- Clock mechanism kit to fit thickness of your plaque (at hobby stores)
- 4 flat-backed crystals or jewelry beads
- decorative-edge scissors (available at craft stores)
- small picture to fit center of clock (we cut out fruits from wallpaper border)
- matte-finish decoupage glue
- craft glue
- drill with bit large enough to make hole for the clock mech. to pass through
- display easel and battery for clock
Steps:
- First, find the exact center of the plaque and drill a hole wide enough for the clock mechanism to pass through.
- Next, paint a base coat of your background color. We used "ochre yellow".
- Once that is dry, apply second coat if needed and let dry.
- Using the small artist's brush, we alternated the stripes around the edge using the width of the brush to make the purple stripe and skipping the same width to make the yellow, etc. We also painted the small edge purple all the way around.
- Next, using the decorative-edge scissors (we used "seagull") cut out your picture for the center in a circular pattern.
- Apply decoupage glue to the back of the picture and the center of the clock where you want the picture to be and attach the picture. Smooth with your fingers or a cloth to remove any air bubbles.
- Use the back of a pencil to "poke" a hole downward through the picture where the mechanism will be. Do this while the glue is still wet to make sure the sides will stay pressed down.
- Now, paint the dots or designs (we used a combination of dots and freehand grapes) measuring equal distance around the face for the numbers.
- Once dry, use the craft glue to glue the flat-backed crystals for added decoration.
- Attach clock mechanism as per package instructions, insert a battery and set on a coordinating display easel. Enjoy!
Variations:
You can customize this project for children's rooms using wooden numbers, animal shapes, etc. Another great variation is to use a larger wood base and use family pictures as the numbers with a group photo in the middle for a great wall-hanging present!
