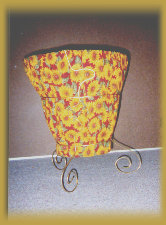
Metal Scroll and Fabric Wastebasket
This project is great because it's easy and
you can match your decor perfectly with the fabric!
The results are beautiful!
Materials:
- 1 , 3-ring metal tomato cage (from garden centers)
- 2 yards choice of fabric (free-moving fabrics are easiest to work with)
- 1 yard 1 - 3 inch decorative lace, fringe or other type edging
- 1 large sewing needle (the ones used on denim work nicely)
- 1 package embroidery floss in coordinating color
- 1 tube liquid stitching glue
- cardboard cut in circular shape just smaller than the smallest ring on tomato cage
- 1 can metal primer spray paint
- 1 can spray paint for metal in coordinating color (metalics work best)
- Heavy duty pliers (blunt nose)
- scissors
- 20 large paper clips or wooden spring clothes pins (for holding fabric in place until sewn and glue is dry)
Steps:
- First, form scrolls in the 3 free ends of the tomato cage using the pliers. You can either face the scrolls inward or outward; this will be the legs of the wastebasket.
- After the scrolls are created, use your hands (Wear gloves for protection) and even out the legs by bending them outward and evening out the three circular areas until everything is level.
- You can also create bending patterns up the long supports of the wastebasket frame with the pliers, but it is not mandatory for the overall look.
- Now, spray the frame with the metal primer, coating entirely, and let dry.
- Once the primer is dry, spray the frame with paint and let dry. We used gold, but any metallic color gives depth.
- After paint is dry, if another coat is needed, apply and let dry.
- Now, you are ready to cut the fabric. It's easiest to fit the fabric inside the frame (large ring on top, scroll legs on bottom) and paperclip in place with the printed side facing out and the raw edge folded up and around the metal ring with the edge facing the inside. You will need enough play in the bottom of the wastebasket to put the cardboard circle shape, which will be the bottom, so you can fit it in now to be sure. You do not have to double the fabric as we did in the basket project unless your fabric is thin and you want to make it more sturdy.
- Once your fabric is clipped in place with the raw edge facing inside the basket, attach it by sewing around the ring with needle and embroidery floss. Make sure you sew with the metal ring in the center by bringing the needle around the top of the fabric and back through the fabric just under the metal ring. Remove paperclips as you sew.
- After the fabric is attached to the ring, trim raw edge to 1/2 inch on the inside of the basket.
- Completely coat the remaining raw edge with the liquid stitching glue and attach the fringe, lace or edging to cover the edge. Use the paperclips to hold this in place until all glue is dry.
- Place the vanity wastebasket in your favorite area and enjoy!
- You could also use the pliers to make "s" scrolls with the paperclips, paint them with gold spray paint, fold them in half and use as liner clips for the wastebasket!