
Leather-look lampshade
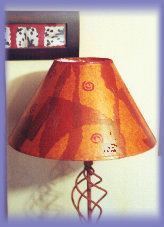
This is a great project because this distinctive look is created with an inexpensive shade and tissue wrapping paper! The look is wonderful.
Materials:
- 1 fabric or paper lamp shade
- 1 jar decoupage "glossy finish" glue
- 1 package metallic copper-color tissue paper (in gift wrapping dept.) --This tissue paper usually has a glistening surface on one side and matte on the other.
- 1 1-inch artist paint brush to apply glue
- 1 2oz craft acrylic paint in contrasting color (we used "tapestry wine" #20592 by Plaid)
- 1 decorative swirl 1-inch paint stamp (at craft stores)
Steps:
- Wipe lamp shade with a damp cloth to remove any dust or debris and let dry.
- Tear tissue paper in uneven large strips and pieces. It's best if the general length will reach from the top to bottom of the shade overlapping by 1/2 inch.
- Working in sections, use a glue/paper/glue technique, applying the paper with the irridescent side facing out.
- Smooth each piece as you go so that there are no wrinkles and only overlap each strip's border by about 1/2 inch so that there will be a contrast in color depth and definition when finished.
- After the entire shade is covered, add glue to the 1/2 inch underside of the top and bottom of the shade and tuck edge of tissue under.
- You can rip and add a few more tissue pieces for more interesting texture.
- After dry, use contrasting acrylic paint and small stamp to add a few extra designs to your shade and let dry.
- Cover the entire finished tissue and painted shade with another coat of glue and let dry. (you can use a damp washcloth to tap on the surface of wet glue to give more texture and less reflection)
Variations:
Glue flat-backed silver buttons, cabochons or upholstery pin heads to appear as seams. You could also add funky fringe around the bottom.
