
Sun Decoupage Wall Art
Materials:
- 1 11x14 picture frame
- 1 11x14 pre-cut mat with 8x10 opening
- 1 jar decoupage glue--glossy finish
- scissors
- 1 to 2-inch wide art paintbrush (to apply glue)
- small natural sponge
- decorative paper in desired colors/prints (available in scrapbooking section of hobby stores) NOTE: you can also cut desired colors from wrapping paper, magazine pages, tissue wrap, stationary, fabric, etc.
- 1 small can clear acrylic spray paint
- optional: sun face opaque sticker
Steps:
- Disassemble the picture frame, removing glass and cardboard backing.
- Your project can be done directly on the cardboard backing or you can use it as a template to cut another piece of matting board.
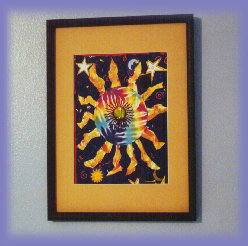
- Using the bottom of a coffee can, formula can or other template for a 4" diameter circle, trace a circle in the center portion of your cardboard.
- We then frehand-drew the rays extending out around the circle.
- Working in sections, starting with the sun, brush on a layer of glue and fill in with cut portions of your paper, layering glue/paper/glue until entire sun is covered. Make sure each time a layer of paper is placed that you brush the top with glue also. Smooth with damp natural sponge as you go to prevent bubbles. (we used a tie-dye printed paper for the sun and rays, but you can get a varied effect using different shades of orange and yellow paper pieces.)
- Using the same glue/paper/glue technique, apply the background pieces. (we used a "starry night" printed wrapping paper, but you could also use a cloud print paper) NOTE: we also used and opaque sun sticker for the sun's face.
- Once all parts are filled in, brush the entire area with a layer of decoupage glue and while still wet, dab it with a dry, crumpled paper towel to give it a textured, painted look.
- After glue is dry, spray evenly with clear acrylic topcoat.
- Reassemble the frame, mat and picture without the glass for a more handmade, artistic look!
- Hang and enjoy!
**You can find a great selection of quality papers for your decoupage projects at We Are Paper.