
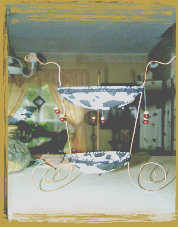
Metal Scroll "Hold-all" Basket
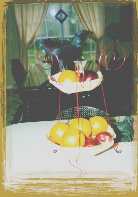
This 2-tiered "catch-all" can be used for just about anything! We use them as fruit baskets, to hold makeup or bath salts in the bathroom, as centerpieces, the list is endless! Just match the fabric to your decor and get creative with different scroll designs and end treatments! You can also add ribbons, beads or decorative fringe to change the look.
.
..
.
.
.
.
MATERIALS LIST:
- Scissors or rotary cutter for fabric
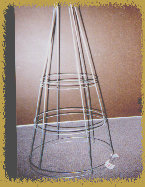
- Inexpensive 3 - 4 foot tomato cage (available in garden centers)
- Choice of fabric (medium weight) about 2 yards
- Decorative edging or ribbon about 1.5 yards
- Heavy-duty sewing needle
- 1 package embroidery floss in coordinating color
- 1 can metallic color spray paint (for use on metal such as "Rustoleum or Krylon")
- 1 can grey or brown metal primer spray paint
- Heavy duty blunt-nose pliers/snips
- 1 can spray clear coat
- One box jumbo metal paper clips
- Liquid stitching glue
STEPS:
- First, use the heavy duty pliers/snips to cut the largest ring on the end of the cage off. The tomato cage should have 3 rings, this will leave you with the two center ones with excess wire above and below each one.
- Now, use the pliers to bend the top 3 rings each into a scroll pattern by holding the cage between your knees on the floor with you sitting in a chair, pliers underhand and facing away from you and twist the 3 metal pieces into a circular design. It doesn't matter if you choose the smaller ring to be the top tier or the larger, we make them both ways. You can also choose to form a different design as we did with the cow pattern. We used a "steer" design for the top metal pieces.
- Either use the same circular scroll pattern for the bottom metal pieces or use your pliers to form a zig-zag design and turn under just on the bottom for the "feet".
- Once your design takes shape, set it on a table and use your hands to do any last minute re-shaping to get the legs level and the scrolls and circular pieces level.
- Now, in a well-ventilated area, spray the design with the metal primer and let dry. You don't have to worry about painting the circular rings because the fabric will cover them totally. (It's best to paint this on a table outdoors because there is a lot of overspray with spray paint and fumes!)
- Once the primer is dry (usually about 3 minutes), spray your paint and let dry. Make sure to cover all areas thoroughly, except the center rings.
- After that is dry, you are ready to spray the clear coat and let dry.
- After all paint is dry, you can begin with the fabric portion. Double your fabric with wrong sides together facing in and right sides out so that it will look the same on top and bottom and measure what will need to be cut for the basket portions. The easiest way that we have found to measure is to form the doubled fabric around the rings and use paper clips or clothes pins to secure the fabric all around the circle and form a "bowl" in the middle. The fabric will be folded over the metal ring and sewn with the ring in the middle to create the bowl portion. (This is really easy although it sounds extensive)
- Once your fabric is cut and secured in place, use your heavy duty needle and embroidery floss to sew through the fabric and around the top securing it with the metal ring in the center all the way around. You will be able to judge the amount of stitching needed to hold the fabric secure. We used a stitch, loop technique. (we are not sew smart so this has no specific name, but it gave a decorative look). Make sure as you are sewing that you maintain the bowl shape in the center about 3 inches deep.
- Once the bowls are created, trim the excess edges to 1/2 inch and use liquid stitch glue to attach the decorative edging around the outside to cover the raw edges. Use large paper clips to hold in place as you go and leave until dry.
- After all glue is dry, remove paper clips and fill with your favorite things! The doubling of the fabric makes the bowls quite strong, yet dainty looking! You can also attach ribbons, cords with beads or other decorations to add to each piece.